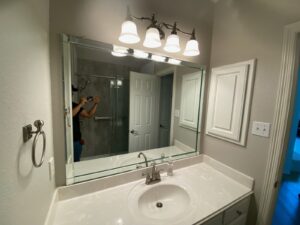
Understanding the Beauty of Frameless Mirrors
Frameless mirrors have become a design favorite in both residential and commercial spaces for their sleek, modern appearance. Unlike traditional framed mirrors, these pieces provide a clean, uninterrupted reflection that enhances the sense of space and light in any room. Whether used in bathrooms, entryways, or bedrooms, a frameless mirror can instantly elevate a room’s aesthetic while maintaining a minimalist look. Before installation begins, it’s important to prepare adequately to ensure a secure and flawless finish.
Step 1: Gather the Necessary Tools and Materials
Before getting started, having all the right tools on hand will make the installation process smoother and safer. You’ll need a measuring tape, level, pencil, masking tape, mirror clips or brackets, wall anchors, screws, a screwdriver or drill, and safety gloves. If the mirror is large or heavy, having a helper is highly recommended to prevent damage or injury. Preparing everything in advance ensures efficiency and precision during the installation process.
Step 2: Measure and Mark the Installation Area
Accurate measurements are the foundation of a successful mirror installation. Begin by determining where you want the mirror to be placed. Use a measuring tape to find the center of the wall or desired area, then mark the top and bottom edges with a pencil. Apply masking tape along the outline to protect the wall and to use as a guide for leveling. Double-check the markings with a level to make sure your mirror will hang straight — even a slight tilt can be noticeable once it’s in place.
Step 3: Choose the Mounting Method
Frameless mirrors can be installed using several mounting methods, including adhesive backing, mirror clips, or J-channel brackets. Adhesive is popular for a clean, seamless appearance, but it requires precision since the mirror cannot be adjusted once it’s attached. Clips and brackets, on the other hand, provide a secure and removable option that’s ideal for larger mirrors. Select a method that best suits your space, wall type, and mirror weight.
Step 4: Prepare the Wall Surface
Before mounting, make sure the wall surface is smooth, clean, and dry. Wipe away dust, dirt, or grease with a damp cloth, then allow it to dry completely. If you’re using adhesive, roughen the area slightly with fine-grit sandpaper to improve adhesion. For drywall or plaster, install appropriate anchors to provide stable support. A properly prepared surface ensures the mirror stays securely in place and prevents future movement or damage.
Step 5: Install the Mounting Hardware
If you’re using clips or brackets, install the bottom supports first. Align them with your pencil marks, then drill pilot holes and insert wall anchors if necessary. Secure the clips with screws, making sure they’re level and evenly spaced. Test-fit the mirror to ensure the bottom clips are positioned correctly. Once satisfied, attach the top clips loosely so they can pivot to hold the mirror securely after it’s positioned.
Step 6: Apply the Adhesive (Optional)
For those using mirror adhesive, apply it in evenly spaced vertical lines or dots on the back of the mirror. Avoid spreading adhesive near the edges to prevent it from oozing out when the mirror is pressed against the wall. Be sure to follow the manufacturer’s instructions regarding drying time and curing requirements. Remember, once the mirror touches the wall, it cannot be adjusted — so accuracy is key.
Step 7: Mount the Mirror
Carefully lift the mirror into place with the help of a second person if needed. For adhesive installation, press the mirror firmly but gently against the wall, starting from the bottom and moving upward to remove air pockets. If using clips or brackets, rest the mirror on the bottom supports first, then tighten the top clips to secure it in place. Use a soft cloth to remove any fingerprints or smudges after installation.
Step 8: Check for Stability and Alignment
Once the mirror is installed, take a moment to verify that it’s level and secure. Step back to ensure the placement looks balanced and symmetrical in the room. If using clips, give the mirror a light tap to confirm it’s firmly in place. For adhesive installations, allow the glue to cure for the recommended time before cleaning or touching the surface. Proper alignment and stability not only enhance the aesthetic appeal but also ensure long-term safety.
Step 9: Add Finishing Touches
After installation, remove the masking tape and clean the surface of the mirror with a non-abrasive cleaner. For a polished look, you can add LED backlighting or accent trim around the edges. Frameless mirrors pair beautifully with modern fixtures, metallic finishes, and neutral tones. The result is a bright, open space that reflects light and sophistication throughout the room.
Benefits of a Properly Installed Frameless Mirror
A well-installed frameless mirror not only improves aesthetics but also increases the perceived size and brightness of any space. It reflects light naturally, enhances décor, and creates a luxurious yet minimalistic feel. Additionally, when installed correctly, frameless mirrors require little maintenance and offer long-lasting beauty. They are ideal for bathrooms, hallways, and dressing areas where style and functionality meet.
Expert Installation vs. DIY Approach
While installing a frameless mirror can be a satisfying DIY project, professional installation guarantees precision and safety—especially for larger or custom-cut mirrors. Experts use specialized equipment to ensure proper leveling, secure mounting, and wall compatibility. If you’re unsure about adhesive strength, mirror weight, or placement, it’s best to consult a professional to prevent potential issues down the line.
Final Thoughts
Installing a frameless mirror requires attention to detail, the right tools, and a steady hand. When done correctly, the result is a stunning and timeless addition that transforms your interior space. Whether you’re enhancing a bathroom vanity or creating a statement wall, a frameless mirror brings both elegance and modern simplicity to your design.
For precision installation and premium mirror solutions, contact Mr. Glass & Mirror — your trusted experts in glass design, fabrication, and installation.